Recently I started writing technical blogs and soon I realized the need to use the syntax highlighter in order to make code look pretty on the blogs. Initially I stumbled upon SyntaxHighlighter and used it for a while. Later I noticed that the code sections didn't appear on the RSS feeds and on Mobile version of blogspot. It gave a clear indication that I may end up loosing some groups of audience using RSS feed or mobile version. It was very much evident from audience stats provided by blogger.com. The moment I realized this, I started looking for the fix or different solution which can work in the given scenarios. I couldn't find the fix for SyntaxHighilighter but I found that google android blog uses some syntax highlighter which works for RSS feed and even for the mobile version of blog. On investigating further with the help of Firebug, I found that PrettyPrint is used to highlight the syntax.
PrettyPrint is present on googlecode.com as well. At the same time I discovered some facts about PrettyPrint which influenced me to use it. These are listed below.
If you are concerned about bandwidth and indexing of your blog on search engine then I suggest you to choose PrettyPrint. As you may be aware that for the blog which takes longer time to load, the search engine spiders either escape it or rank them lower.
If you are interested to know more about Prettyprint, you can find it over here.
Your valuable comments are always welcomed. It will help to improve my post and understanding.
"By three methods we may learn wisdom: First, by reflection, which is noblest; Second, by imitation, which is easiest; and third by experience, which is the bitterest."
By : Confucius
PrettyPrint is present on googlecode.com as well. At the same time I discovered some facts about PrettyPrint which influenced me to use it. These are listed below.
Comparison:
| PrettyPrint | SyntaxHighlighter |
|---|---|
| It's light and requires only two files (prettyprint.js and prettyPrint.css) | You need to include different js files for different syntaxes. |
| Minified js file is provided | Minified js is not provided. |
| Takes less bandwidth because it's minified and only two files need to be downloaded by browser. | Takes more bandwidth because it's not minified and if you have included more files then it takes longer to download. |
| You can see the code on RSS feed and mobile blog but the code is not highlighted. | You can't see the code section and you may loose audience using RSS feed and mobile blog to follow your blog. |
| Customization of the color scheme can be done by providing css file. | Can't be done here. |
| No need to specify the language, It guesses automatically. The same file works for most of the languages. | You need to specify the language otherwise it doesn't work and for every different language the different js file is required. |
| Syntax is highlighted even for the preview of the post. | It doesn't work for post preview. |
| Scroll is not provided for code segment. Code looks awkward if the lines are longer and goes out of current frame. You need to manually divide lines to shorter one so that it fit in current frame. | Scroll bar is provided. No manual work is required. |
| Very few sites use it e.g Google. | Most of the sites are using it where RSS feed and mobile version is not used. |
| Some of the lines can't be highlighted though the line number can be marked. | You can highlight lines. |
If you are concerned about bandwidth and indexing of your blog on search engine then I suggest you to choose PrettyPrint. As you may be aware that for the blog which takes longer time to load, the search engine spiders either escape it or rank them lower.
Integration with blogger:
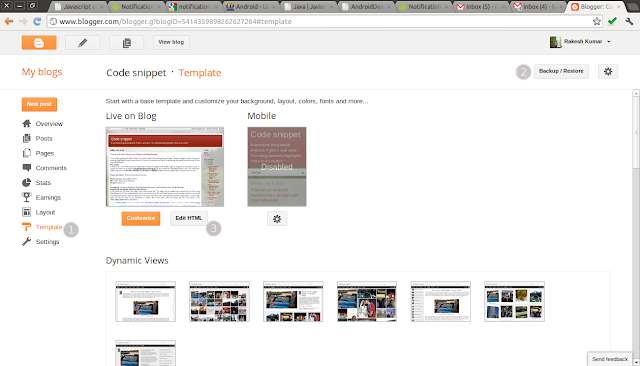
For integrating Prettify, we need to modify the template and put the reference of prettify.js prettify.css in the script tag under Head tag. Steps are given below.- Go to the blogger dashboard, then click Template link present on the left-hand-side list, which is marked as 1 in the picture shown below.
- Once you are on the Template window your dashboard will look similar to the one shown in the picture below. Before modifying the template you can save it and if something goes wrong then you can easily restore the previous template.
- To backup the template just press the button which is in the upper right corner and marked as 2 in the picture below.
 |
| Template dashboard |
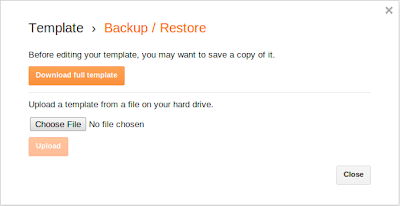
- Backup/Restore dialog will appear as shown in the picture below. Click download full template and store template in your local machine.
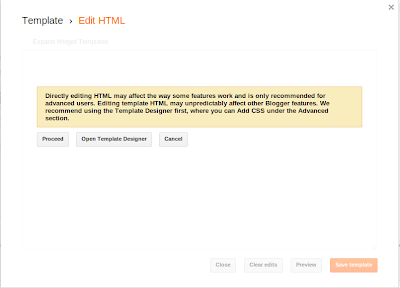
- Again go back to the Template dashboard and click on Edit HTML button. Edit HTML dialog box will appear.
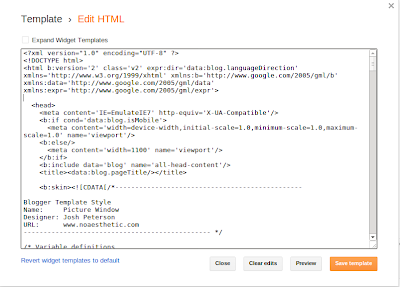
- Click Proceed button. This will take you to editor where you can change html code as shown in the picture below.
- Put the following tags in <head> tag section of HTML template.
<link href="http://google-code-prettify.googlecode.com/svn/trunk/src/prettify.css" type="text/css" rel="stylesheet"/> <script type="text/javascript" src="http://google-code-prettify.googlecode.com/svn/trunk/src/prettify.js"> </script> -
Edit the <body> tag and it should look like as shown below.
<body onload="prettyPrint()" ... >
- Once you are done, just save the template.
Usage:
- In your post/blog surround your code with <pre> or <code> tags. as shown below.
  <pre class="prettyprint">...</pre>
             or
 <code class="prettyprint">...</code>
| Without PrettyPrint | With PrettyPrint |
|---|---|
         import pretty.print.example;
         class MyprettyPrint{
          public prettyPrint(){
             println("Hello PrettyPrint !!");
          }
         }
|
         import pretty.print.example;
         class MyprettyPrint{
          public prettyPrint(){
             println("Hello PrettyPrint !!");
          }
         }
|
If you are interested to know more about Prettyprint, you can find it over here.
Your valuable comments are always welcomed. It will help to improve my post and understanding.
"By three methods we may learn wisdom: First, by reflection, which is noblest; Second, by imitation, which is easiest; and third by experience, which is the bitterest."
By : Confucius


